Refrigerator Repair & Icemaker Repair
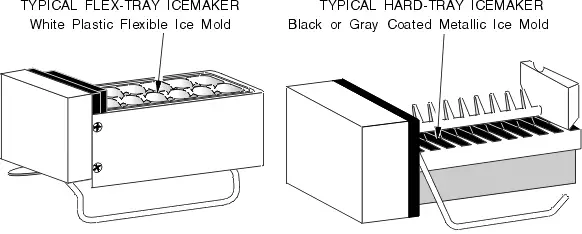
Icemakers are divided into two basic types; flex-tray and hard tray. (Figure A-1)
FLEX-TRAY
Flex-tray icemakers have a flexible plastic ice mold, or "tray," similar to manual ice molds. Also like manual molds, when it comes time to eject (harvest) the ice from the mold, it inverts
and twists, "popping" out the ice. The tray then turns back upright and refills with water for the next freeze cycle.
HARD-TRAY
Hard-tray icemakers have a metal ice mold which is coated with a non-stick coating. The ice mold remains upright, and cubes are ejected by some mechanical device which pushes the ice out of the mold and into the ice bin.
The operation of the icemaker can be broken down into three cycles; the freeze cycle, the harvest cycle and the fill cycle.
FREEZE CYCLE
The freeze cycle begins after the mold has filled with water. It ends when the water is completely frozen into cubes and the harvest cycle begins. The amount of time spent in the freeze cycle is controlled by a number of factors depending on the individual design, but it is best explained by knowing how the harvest cycle is triggered.
HARVEST CYCLE
The harvest cycle occurs when the ice is ejected from the ice mold. (Figure A-2) The harvest cycle is triggered in one of two ways, depending on whether the icemaker has a flexible ice mold, (flex-tray) or a rigid metal ice mold. (hard-tray)
FLEX-TRAY HARVEST CYCLE
Most flex-tray icemakers harvest ice solely on the basis of accumulated time, or "run" time. Timing is accomplished by a low-rpm icemaker drive motor acting through reduction gears. Every two hours or so of "run" time, depending on the design, the icemaker harvests. However, it should be noted that the accumulation of "run" time is, in one way or another, thermostatically controlled. For example, Admiral-type flex-tray machines have a thermostat in line with the icemaker timing and drive motor that opens at 19 degrees, and doesn't close again till the freezer temperature drops to 15 degrees. Therefore, time only accumulates if the temperature drops below 15 degrees. Whirlpool flex-tray icemakers accumulate time only while the compressor is running, which is determined by the cold control, which is the thermostat that controls the refrigerator and freezer temperatures.

HARD TRAY HARVEST CYCLE
In hard-tray icemakers, harvest is triggered thermostatically. A thermostat pressed against the ice mold senses that it is cold enough to ensure that the ice is frozen. (For example, the thermostat on the late model modular crescent-cube machine closes at 17 degrees F.) When the thermostat closes, the drive motor activates, and the harvest begins.
When the harvest cycle begins in hard-tray icemakers, a heater begins slowly heating the ice mold. When the harvest mechanism contacts the ice, it stalls until the ice melts enough to release it from the mold. Though the surface of the cube does liquefy slightly, it refreezes quickly. Cubes in the bin might occasionally stick together a little bit because of this liquefication, but they should be easy to separate.
In a hard-tray icemaker, the thermostat starts the harvest cycle, but it does not end the cycle. The mold heater would open the thermostat and end the cycle way too early; long before the mold was refilled. When the thermostat begins the harvest cycle, a cam attached to the drive motor closes a "holding" switch. This switch keeps the drive motor turning until the ice is harvested and the mold refills with water. When the ejection mechanism is reset, the mold is refilled and the cam reaches the proper position, the cam allows the holding switch to open. This ends the fill cycle and begins the freeze cycle.
FILL CYCLE AND FILL VALVE
Towards the end of the harvest cycle, a cam on the drive mechanism closes the fill switch. This switch opens a fill solenoid valve, usually located on the back of the fridge, at the bottom. (Figure A-3) In refrigerators with water dispensers in the door, a dual water solenoid valve is used. One controls water to the door dispenser and the other controls water to the icemaker.

The amount of water that enters the ice mold is controlled by a couple of things. The shape of the cam that closes the fill switch controls the length of time the valve stays open. A flow control washer within the valve adjusts the flow for variations in house water pressure, so that the same amount of water flows through the valve regardless of water pressure. However, if the water pressure is below about 20 psi at the solenoid valve inlet, problems can occur; see sections 8-2(a) and 8-3.
One of the reasons that icemakers can be so dog-gone tough to diagnose is the simple observation that ice takes an hour or two to freeze in a freezer. After a repair, you can't stand there with the freezer door open, waiting for the next harvest cycle, to make sure the machine is working properly. Symptoms may take time to develop and recur if the machine is not fixed the first time. Most icemakers are temperature-sensitive, and as the freezer temperature rises and falls, this sensitivity can cause symptoms to be intermittent.
Icemakers can behave erratically, and be difficult to diagnose because of it. But a basic understanding of how a particular design operates can go a long way towards removing the mystery of intermittent malfunctions. Before you start working, observe the symptoms of the malfunction. Knowing how the icemaker should operate may point you towards what isn't operating correctly.
Has the fridge or freezer seemed warmer or colder than usual? This can point towards refrigerator problems other than the icemaker, such as defrost or sealed system problems. Freezer temperature in most cases should be between 0 and 15 degrees Farenheit. Any higher, and the ice may not freeze fast enough or the thermostat may not trigger a harvest cycle. Any lower, and the cold may migrate into the refrigerator compartment.
Has the freezer or refrigerator door been opened a lot? In some circumstances, this can keep the freezer temperature too high and cause slow or no ice production, or "shelling," where the cube has not frozen completely before the harvest cycle begins.
Do not yet discard any "slabbed" ice. The way the ice is slabbing can help tip you off to the cause of the problem. For example, ice cubes fused together at the top can indicate an overfill or levelling problems; ice slabbed in the bin can indicate shelling, ice mold leakage, or a variety of other problems.

Icemaker complaints seem to be generally divided into five main symptoms.
A) Ice cubes taste or smell bad. See section 8-3, water supply problems.
B) The ice is "slabbing;" cubes are freezing together into blocks in the bin. See section 8-2(a).
C) "Hollow" cubes. The ice cubes are "shelling," or not freezing completely before the harvest cycle tries to eject them from the mold. See section 8-2(b).
D) The fill tube keeps filling with ice and blocking the flow of fill water. See section 8-2(c).
E) The icemaker is not working at all and not making ice, or is producing ice very slowly. See section 8-4.
This generally occurs when the ice is not ejecting from the ice mold properly. If there are cubes left in the ice mold after a harvest cycle, the new waterfill will overfill the mold for the next batch. Depending on the design, this may cause the mold to overflow, or it may just cause a thick sheet of ice to fuse together the tops of the cubes too solidly. In this case, the icemaker can jam and the problem can compound itself rapidly.
This can be caused by a number of factors. One of the big culprits is freezer food placed too close to the icemaker. This can simply prevent the ice from dropping into the bin, (Figure S-1) or it can interfere with the ice level sensor arm, preventing the icemaker from shutting off when the bin is full. (Figure S-2) In this case, the solution would be to clear the excess ice and...don't do it again!!!

Another culprit can be that the surface of the mold is too rough for the ice to properly eject. (Figure S-3) This may be caused by hard water calcium buildup, scale or corrosion of the ice mold surface. Both hard-tray and flex-tray machines are prone to this problem; it is caused by impurities in the fill water. (see section 8-3) In hard-tray machines, the ice mold surface coating may actually separate from the metal mold itself. The problem can get so bad that you may see black or gray flakes and sediment in the cubes. In both hard- and flex-tray machines, the solution is usually to replace the ice mold, or just the entire icemaker. In some circumstances, scale can be removed with a weak solution of lime cleaner. If you do this, rinse the mold with a weak chlorine bleach solution and flush with copious amounts of water before you put the mold back into service. If possible, try to get a better hard water filtration system installed in the icemaker water supply.

LOW WATER PRESSURE
Water supply pressure below about 20 psi can cause low water fill and small cube size. Sometimes, some cubes may not eject properly and may stay in the mold. The next fill will then cause overfill, and slabbing symptoms may develop.
Low water pressure can also cause the valve to leak, sometimes badly enough to overfill or overflow the ice mold. However, this particular problem usually shows up as an ice-blocked fill tube. See Section 8-2(c), section 8-3 and Figure S-4.
Hollow cubes, or "shelling" can occur if the ice cubes are not fully frozen when the harvest cycle begins. The causes and effects of shelling vary. Depending on the design, either the harvest cycle is being triggered prematurely, or the cube is not freezing in the allotted time.
Shelling may be an early sign of defrost, sealed system or other cooling problems of the refrigerator itself, especially in flex-tray machines. Check the freezer temperature.
In flex-tray machines with shelling symptoms, water pouring from the ice mold during the harvest cycle may freeze the bin into a solid block from the bottom up (slabbing.) Slush left in the ice mold may also cause overfill. The freezer vents in flex-tray machines must direct cold air directly at the surface of the water or the mold, to insure that it will freeze in the alloted time. Check that nothing is blocking the airstream and that the freezer vent directing air over the icemaker is not damaged, missing or misdirected.
In hard-tray machines with shelling symptoms, ice or water left in the mold after harvest may cause overfill and slabbing problems. Shelling is usually a sign of low waterfill, which allows the mold to get colder faster, triggering the thermostat into a harvest cycle too quickly. Check and adjust the water level (sections 8-5 thru 8-8) or check for low water pressure or the incorrect water valve. (section 8-3(b)) There is a baffle kit for late model Whirlpool crescent-cube machines with shelling problems, that redirects air over the ice to freeze it more quickly.
If the fill tube gets choked up with ice, (Figure S-4) it usually means that the water fill solenoid valve is leaking. The valve is not closing properly and is dribbling water. If the leakage is slow enough, water may freeze in the fill tube. Over time it will freeze the tube completely shut.
To melt the ice from the tube and clear it, you can use a blow dryer, or blow hot water into the tube with a turkey baster. Hot water is faster but usually a little messier. Put a couple of towels and/or a pan below the tube to catch the water runoff.
You should replace the solenoid valve (be sure to read through section 8-3(b)). However, this may not be the whole solution. Wear and tear may have caused the valve to leak, but not necessarily. Sediment from improper installation or low water pressure may prevent the valve from closing fully. If you have this symptom, especially if it returns after clearing the ice blockage once, start checking for water supply pressure or sediment problems. See Section 8-3, water supply problems.

A commonly overlooked cause of many problems is an inadequate water supply. Water supply problems can cause a variety of symptoms. Sediment or odor in the ice, water solenoid valve problems and even inoperation or slow operation of the icemaker itself can be traced to water supply problems. I cannot stress enough the importance of having an adequate, properly filtered water supply!!!
Of particular concern is the source of the water.
Ideally, the system should come directly from cold-water copper piping in the house. I've seen people tap into hot water pipes, but the piping should be long enough so that water does not fill the icemaker while hot, or the water may not freeze fast enough. It is far better to use a cold water line if possible.
"Saddle valves" are often used on a new installation to pierce into an existing pipe, (Figure F-1) and generally work pretty well. However, you must be careful of using dissimilar metals; for example a copper valve on a galvanized steel pipe. A water supply drawn from a saddle valve on a galvanized pipe is an invitation to scale and sediment problems.
Similarly, a saddle valve installed too close to a hot water tank can pick up calcium sediments from the tank itself. Scale and sediments can block the saddle valve and cause low water flow.
Low water flow through the saddle valve may cause the same symptoms as low water pressure at the solenoid valve inlet. (see section 8-2(a)) If unfiltered, these impurities can also cause poor quality ice. They can also get into the solenoid valve seat and prevent the valve from closing fully, causing symptoms from fill tube freeze to slabbing. (see below)

If your system uses a saddle valve, and has low pressure symptoms as described in section 8-2(a), you may be able to temporarily knock some of the sediment loose by "exercising," or opening and closing the saddle valve a number of times. Also replace the solenoid valve, especially if the supply line is unfiltered. However, the only long term solution is to secure a better supply, directly from a copper cold-water pipe if possible. And use the proper filtration for the water in your house, or at least a sediment filter.
PIPING: COPPER OR PLASTIC?
I prefer plastic. It's a little cheaper, easier to cut and install, and less prone to leakage when you have to move the refrigerator. However, some people feel it's more prone to leakage than copper simply because the material is stronger. That's not been my experience, but it's your call.
If you do use plastic, make sure you insert the brass sleeves into the ends (Figure F-2) before installing the compression fittings. Without them, the ends of the plastic could collapse and leak.
HOT WATER OR COLD?
I've seen people tap into hot water lines to feed the icemaker, but I highly recommend against it. You definitely don't want hot water actually entering the icemaker mold; the water would take longer to freeze and cause shelling or slabbing problems.
If you do tap into a hot water line for the icemaker supply, make sure there's a nice, long run of water tube before it gets to the refrigerator, to allow time for the water inside the line to cool between fills. Install a couple of loops of tube if you have to. Also, use copper line; it conducts heat better and is more resistant to heat damage than plastic.
One amusing little anecdote that I read on the internet was about an individual who piped hot water to his icemaker, reasoning that "hot water freezes faster." Well, heat flow is greater when the temperature difference is greater, so the heat will actually flow out of the water and into the freezer faster while the water is hot. But when the temperature of the water drops, the heat flow slows to the same rate as if you had just filled it with cool water in the first place. And since, to begin with, the temperature has further to go, it takes longer to freeze hot water!

Water filtration is a subject for a whole book unto itself. Common complaints and contaminants are chlorine, rust, sand, dirt, sediment, dissolved calcium, organic substances such as PCB's, THM's, herbicides and pesticides, chloramines and detergents, causing bad taste, odors or even health hazards. This book is not intended to be a primer on water filtration; I would in no way begin to try to pretend to be able advise you what contaminants you need to guard against in your area. For that, you need to hire a water chemist, or talk to your water company or neighbors who might have been through this already. You might even try talking to your appliance parts dealer; he may know what local conditions are and carry the correct filtration elements.
However, as a bare minimum, you should filter out dirt, sand, rust and sediment. These contaminants you can pick up independent of what your water company supplies you, through old or inadequate water piping or other house conditions. This applies even (especially!) to brand new homes. Ever seen a pallet load of pipe laying on a construction lot? You don't think the pipefitters washed all the bugs and dirt out of the tubing before they brazed it in place, do you?
INLINE AND UNDER-SINK (CARTRIDGE) FILTERS
(Figures F-3 and F-4)
In my opinion, about the only good thing about inline filters (vs. cartridge-type filters) is that the initial cost tends to be quite a bit less.
However, inline filters are harder to change; usually you have to cut the old one out and pipe the new one in. Being behind the fridge instead of under the sink, they are harder to get to, and easier to forget to change.
Cartridge-type filters, on the other hand, have replacable cartridges which are relatively easy to get to and change. Some even have water shutoff valves built right into them to make filter changing even faster and easier. They are little, if any, more difficult to install initially, and replacement cartridges usually cost less than a new inline filter. You can also pipe them fairly easily to a drinking water sink tap if desired.

When installing either a new inline water filter or under-sink filter cartridge, especially an activated charcoal type, first connect it to the water source. Then run several gallons of water through it until you see the water running clear. Then connect it to the refrigerator. Then, just to be safe, I throw away the ice that it makes for the first 24 hours.

REVERSE OSMOSIS SYSTEMS
Reverse Osmosis water purification systems (commonly referred to as "RO" systems) purify water by forcing it at high pressure through a porous membrane. This removes almost every contaminant whose molecules are bigger than water molecules.
The result is extremely clean-tasting water, easily comparable with bottled water.
The down side, aside from initial cost, is that they waste a LOT of water. When the new membrane is new, probably half of the water that enters the RO system goes down the drain to flush themembrane. If you don't change the elements frequently, then when the membrane gets older and plugged with contaminants, as much as 15 to 20 times as much water goes down the drain as comes out the faucet. Also, water flows through the RO membrane very slowly, so it can drop water pressure at the tap considerably.
Most manufacturers recommend AGAINST an icemaker water supply coming from an RO system. I don't necessarily agree. I have been personally using an RO system on my Whirlpool crescent cube icemaker for two years now and I am tickled with the results; ice as clear and clean tasting as our drinking water, and no scale or calcium deposits. (And I live in an area with VERY hard water.) However, I must qualify my experience on two accounts.
First, unlike some RO systems, mine has a five gallon pressure / holding tank which maintains adequate water supply pressure to the valve at all times.
Second, soft water is relatively acidic, so I am keeping my eyes open for any sign of deterioration of the ice mold coating, and I'm willing to eat an icemaker if it happens. (Beats listening to my wife whine about the yucky tasting ice for a couple of years!)
As a general policy, I'd have to recommend against RO purifying the icemaker water. But if you understand the risks, and the RO system doesn't drop the water pressure too low, it can be done.
Water fill volume is controlled by a couple of things. For one, the length of time the valve stays open, which is usually controlled by a cam in the icemaker head, which closes a switch for the proper amount of time. A flow control washer within the valve adjusts the flow for variations in house water pressure. However, if the water pressure is below about 20 psi at the solenoid valve inlet, problems can occur. Low water pressure can cause low water fill and small cube size. If the cube is too small, it may not eject properly, and the next fill may cause overfill.
Water solenoids operate using a pressure diaphragm with pressure on both sides of the diaphragm. Adequate water pressure is required both to open the solenoid valve and to close it. If the water pressure is low, the valve may not close fully and may leak. Replace any leaking solenoid valve; but be alert for whatever conditions might have caused it to leak in the first place.
A HUGE point of concern is in getting the right water solenoid valve. Different icemakers require a wide variety of fill volumes, from about 3 ounces in certain GE units to as much as 8 ounces in Admiral-type machines. The valve bodies might look the same from the outside, but you must make sure the valve is the correct one (has the correct flow control washer) for the icemaker you're working on. If someone has previously replaced the solenoid valve, and you experience low flow problems or slabbing in an icemaker, double check that the valve is the correct one. If necessary, call your parts supplier and check the part number. This is a critically important point.
To test fill volume, remove the icemaker from its freezer wall mounting (but leave it plugged in) and initiate a harvest cycle if possible. Baby bottles are generally just about the right size for testing fill volume; most are graduated in both cc's and ounces. A good rule of thumb is that one fluid ounce equals about 30 cc's.
Water fill level can be adjusted on some icemakers. See sections 8-5 thru 8-8 about your design.
There are a number of things that will slow or stop the production of ice. If you are working on an icemaker where you can do so, a good start is to try to manually trigger a harvest cycle and watch what happens. (For triggering instructions, see section 8-5 thru 8-8 about your brand.) To a high degree, the diagnosis depends on the make and model of the icemaker. However, there a few common causes.
Check the freezer temperature. Use a calibration thermometer, available cheaply in most appliance parts stores. In most icemakers, a freezer temperature above about 15 degrees may cause icemakers not to harvest or to have other ice production problems. If the freezer temperature is hovering right around the thermostat temperature setting, the icemaker's thermostat may open and close, causing slow or intermittent ice production. If the freezer temperature is not low enough, check the refrigerator's temperature settings.
High freezer temperatures may also mean that the refrigerator has cooling problems such as defrost or sealed system malfunctions. If adjusting the controls doesn't lower the freezer temperature, see Chapters 4 and 5.
Check that the icemaker is getting power. Unplug it from the freezer wall socket and see if you have power between at least two of the terminals.
Check also that the icemaker is getting water. If possible, unmount the icemaker from the freezer wall and manually initiate a harvest cycle. Collect and measure the water fill. (While you're at it, check it for bad smell or taste, too.) If no water comes out, check that the fill solenoid valve is getting voltage, and check for continuity through the solenoid as described in Chapter 1. A clogged or defective water valve or fill switch should be replaced.

These icemakers are used in many different brands. The design of the crescent-cube machine is, in my opinion, far superior to others. They crank out lots of ice pretty darned reliably. Conversion kits are available to change most refrigerators from other icemaker designs to the crescent cube design if desired.

NOTE: These icemakers are virtually commodity items at this point in time. In many circumstances it may be cheaper and easier to buy a new one than to make a repair. Check your local prices.
There are three types of these machines; a "compact" design, a "modular" design, and an electronic version. You can tell the difference between them when you remove the plastic cover. (Figure X-2) The "modular" design has a thick grey plastic plate to which the motor mounts. The "compact" design has a metal plate. The electronic one has a circuit board and an on-off rocker switch on the right side of the icemaker head.
Most of the symptoms and the malfunctions between the three designs are similar. However, the internal differences between them are pretty pronounced, so testing and troubleshooting are quite different.
The harvest cycle on these icemakers is thermostatically triggered. A thermostat inside the icemaker head is pressed against the ice mold. (Figure X-3) When the mold gets down to about 17 degrees, the thermostat closes and starts the drive motor, and energizes the mold heater. Very shortly thereafter, a cam on the drive shaft closes the holding switch, keeping the motor circuit energized even after the thermostat opens back up. The shaft rotates clockwise until the ejection fingers press against the ice. The motor then stalls, with the ejection fingers applying pressure to the ice, until the mold heats up enough for the cubes to separate from the mold. The fingers then continue pushing the ice out of the mold.

Sometime during the harvest cycle the thermostat opens and the mold heater shuts off, but the holding switch keeps the motor turning.
Shortly after the fingers pass through the 12 o'clock position, another cam attached to the driveshaft closes the fill switch for about 7-8 seconds and the mold fills with water. Shortly thereafter, the holding switch opens, stopping the drive motor, and the icemaker is ready for another freeze cycle.
There is a third switch in the icemaker head; the shutoff switch. This switch is activated by the ice level sensor arm. If the ice level in the bin is too high, or if you raise the arm to the shutoff position, this switch opens and interrupts the thermostat circuit. The icemaker then will not enter a harvest cycle until the sensor arm is allowed to return to its full down position. During the harvest cycle, a cam raises the sensor arm and opens the shut-off switch, but the holding switch keeps the motor turning. After the ice drops into the bin, the sensor arm drops back down into the fully-lowered position and closes the shut-off switch unless the ice level prevents it.
The water fill on these icemakers should be about 140 cc's and take 7.5 seconds. There is an adjustment screw on the right side of the icemaker head; one full turn equals 40cc's. Some models have water level adjustment dials on the right side of the plastic icemaker head cover that attach to this screw. This screw simply moves the fill switch closer to the cam on the drive shaft, keeping it open longer, or vice-versa. The maximum adjustment on these machines is one full turn in either direction; any more will damage the icemaker head. When adjusting the level, do it gently and do not attempt to force it AT ALL.
TROUBLESHOOTING
Aside from water supply problems, what usually goes wrong with these machines is that the thermostat (bimetal) fails. Typically, the symptom will be inoperation; it just won't be making any ice. If the mold is full of ice, jump the thermostat to see if the machine harvests normally. To jump the thermostat and trigger a harvest cycle, just jumper between the T and H test point holes. (Figure X-4) Leave the jumper in until you hear a "click," (this is the holding switch closing) then remove it. A defective thermostat can be replaced by removing the cover plate. When replacing the thermostat, put a dab of aluminum putty on the face of it (where it contacts the ice mold) to insure good contact and heat transfer from the ice mold.

MOLD HEATER FAILURE
AND MOTOR FAILURE PROBLEMS
If the mold heater fails, the cubes will not separate from the mold and the icemaker harvest cycle would stall indefinitely. In this case, you would see the ejection fingers pressed against the ice, trying to eject it, but it would not eject. Under power, test for line voltage between the L and H test point holes; if it is energized, then power is going to the heater. Unplug and test for resistance between the same test points; the heater should test 72 ohms. If not, replace the mold.
If the drive motor isn't turning at a time when it should be, test for 110 volts between L and M to see if the motor is energized. Then unplug the icemaker and test resistance between the same test points. It should test at 8800 ohms. If not, replace the motor.
These icemakers are very similar to the modular style icemakers in the previous section; the modular ones being a refinement of these machines. The water fill on these icemakers should be about 140 cc's and take 7.5 seconds. There is a water level adjustment screw inside the cover. Some have water level adjustment dials on the right side of the plastic icemaker head cover.
The harvest cycle on these icemakers is thermostatically triggered. A thermostat inside the icemaker head is pressed against the ice mold. (Figure X-5) (When replacing the thermostat, use a dab of aluminum putty to insure good contact and heat transfer from the ice mold.)

When the mold gets down to about 17 degrees, the thermostat closes and starts the drive motor, and energizes the mold heater. Very shortly thereafter, a cam on the drive shaft closes the holding switch, keeping the motor circuit energized and turning even after the thermostat opens back up. The shaft rotates clockwise until the ejection fingers press against the ice. The motor then stalls, with the ejection fingers applying pressure to the ice, until the mold heats up enough for the cubes to separate from the mold. The fingers then continue pushing the ice out of the mold.
The thermostat stays closed throughout the first rotation of the ejection fingers. Near the completion of the first rotation, another cam attached to the driveshaft closes the fill switch, but
water fill does not occur. The shutoff switch is closed, and offers a lot less resistance than the water valve circuit. (Figure X-6) Electricity will follow the path of least resistance, so the water valve will not open unless the thermostat is open.
Sometime during the second rotation of the ejection fingers, the thermostat opens and the mold heater shuts off, but the holding switch keeps the motor turning. Near the completion of the second rotation, the fill switch closes again for about 7-8 seconds, and this time the mold fills with water. (Figure X-6) Shortly after the fill switch opens, and waterflow stops, the holding switch opens. This stops the drive motor, and the icemaker is ready for another freeze cycle.

There is a third switch in the icemaker head; the shutoff switch. This switch is activated by the ice level sensor arm. If the ice level in the bin is too high, or if you raise the arm to the shutoff position, this switch opens and interrupts the thermostat circuit. The icemaker then will not enter a harvest cycle until the sensor arm is allowed to return to its full down position. During the harvest cycle, a cam raises the sensor arm and opens the shut-off switch, but the holding switch is still closed, which keeps the motor turning. After the ice drops into the bin, the sensor arm drops back down into the fully-lowered position and closes the shut-off switch unless the ice level prevents it.
TROUBLESHOOTING
These machines are subject to most of the same malfunctions as their more modern modular cousins; namely, thermostat, mold heater and drive motor failures. However, they do not have test points, so they do not share the same testing procedures.
To initiate a harvest cycle, turn the motor pinion counterclockwise (Figure X-7) until the holding switch closes and the drive motor begins turning under its own power.

These machines also seem to have a problem with the motor pinion gear drive gear slipping off the drive motor shaft. When you remove the plastic cover, you will see the motor gear turning and disengaged from the larger ejection drive gear. The motor gear can be pressed back on and glued with superglue.
Some of these machines have a "chiclet"-type thermal fuse (figure X-8) attached to the underside of the ice mold, near the icemaker head. If this fuse blows, the icemaker will not harvest, nor will the motor start when you try to manually initiate a harvest cycle. These fuses are non-resettable; they must be replaced. To test, just remove power from the icemaker and check continuity through the fuse. If the fuse has blown, the ice mold has overheated at some time. Since the heater is in series with the thermostat, it usually means the thermostat is staying closed or that the motor has stalled for too long while trying to eject ice.

There are three micro switches inside the icemaker head. (Figure X-5) The shut-off switch is activated by the ice level sensor arm and prevents the harvest cycle from taking place unless the arm is down. The other two microswitches are the waterfill switch and the holding switch, both cam-operated. The thermostat initiates the harvest cycle, but the holding switch keeps the drive motor turning through the complete cycle, even after the thermostat has opened.
These machines cannot be serviced; they must be replaced when defective. Fortunately, they're pretty much commodity items at this point, and can be replaced for well under a hundred bucks.
These machines produce five cylindrical cubes per harvest. The water fill should be 70 to 85 cc's, or about 6 seconds.

Parts are commonly available for these machines;. however, you may want to consider converting to the crescent-cube design. Crescent cube machines produce far more ice, far more reliably. And at the time of this writing, conversion kits are available for about 75-100 bucks. If there is an ice dispenser in the door, you may need to turn down the crescent cube size a little to get the cubes to go through the door properly.
OPERATION
The harvest cycle begins thermostatically at about 16 degrees. A heater activates to release the cubes from the mold. An ejection shaft through the bottom of the ice mold is attached to an ejection pad, which pushes the cubes vertically from the mold. The cubes are then swept off the mold and into the bin by a "harvest rake." (Figure X-9)

On the start of ejection, the first switch of a three-leaf switch closes. (Figure X-10) This is the holding switch, and it keeps the motor turning even after the thermostat closes again. The second contact in the leaf switch is for the water fill. It is activated by the bump on the cam for about six seconds near the end of the cycle. There is a water level adjustment screw embedded into the cam.

There is another switch in the icemaker head; the shutoff switch. (Figure X-11) This switch is activated by the ice level sensor arm.

If the ice level in the bin is too high, or if you raise the arm to the shutoff position, this switch opens and interrupts the thermostat circuit. The icemaker then will not enter a harvest cycle until the sensor arm is allowed to return to its full down position. During the harvest cycle, the mechanism raises the sensor arm and opens the shut-off switch, but the holding switch keeps the motor turning. After the harvest rake sweeps the ice into the bin, the sensor arm drops back down into the fully-lowered position and closes the shut-off switch, unless the ice level prevents it.
Some models also have a safety (hi-limit) thermostat, which prevents accidental overheating of the ice mold.
TROUBLESHOOTING
Almost invariably, service on these machines involve a leak around the ejection shaft and ice slabbing in the bin. There is a shaft seal replacement kit available; it's a tricky installation requiring a couple of special tools.
About the only other fairly common complaint is thermostat failure. The icemaker will not be producing ice, and you're sure the freezer is cold enough, but manually jumping the thermostat produces a harvest.
There are two test connections on the underside of the icemaker head. In both, a small rectangular plug in the bottom of the icemaker head can be removed to reveal two small holes. (Figure X-12) The black plug is for the safety (hi-limit) thermostat, which prevents accidental overheating of the ice mold; not all models have this thermostat or this plug. The white plug is for the operating thermostat. If the thermostat is bad, replace it.

The ice mold of these icemakers is in front of the head as you look into the freezer compartment. When the harvest cycle is initiated, it takes about eight minutes for the tray to rotate completely around and refill. The lower the freezer temperature, the more ice it will produce. Above 19 degrees, it will not produce ice at all.

You can tell if the motor is turning by looking at the end of the motor shaft as shown on the illustration. (Figure X-13)

You can initiate a harvest cycle manually by pushing the two switches as shown in the illustration; (Figure X-13) the lower left away from the shaft, and the right center towards the shaft, while simultaneously slowly and firmly turning the ice tray clockwise until the motor takes over and starts turning the tray. (It sorta takes three hands or strong thumbs to do this) Observe the whole cycle, especially the twisting action when the tray is inverted. As the tray fills, watch beneath the ice mold for any water leakage. The water fill should be about 180-220 cc's and take about 13-14 seconds. There is an adjustment screw on the right side of the head, but the factory glues it in place during construction. In fact, the factory doesn't want you messing with these machines at all; if they malfunction, the solution is to replace them. I have had a couple of these icemakers apart and I'd have to agree with the factory in this case. Just replace them. Trust me. After you replace your old one, try pulling it apart and reassembling it and you'll see what I mean.
A conversion kit is available to convert the refrigerator to a crescent-cube design, and I would highly recommend it. They are not difficult to install, although some installations require minor cabinet modifications and/or water level changes. Instructions will be included in the conversion kit.
During the harvest cycle in this design, the twisting action of the ice tray ends with a relatively violent SNAP! Over time this can have several adverse effects.
The icemaker can begin to pull its wall mounts out of the freezer wall. If this happens, the icemaker will not be level. Cubes on the high side of the mold may be too small, while cubes on the low side may be too large or even slab together, and fail to eject.
The plastic mold (tray) can crack, especially around the hub. (Figure X-14) The tray may leak, or not twist, preventing proper cube ejection.
If the spacer (bushing) around the shaft (behind the icemaker head) is worn or missing, the tray will not be held close enough to the head for the tab on the tray to catch the tab on the head and twist properly. (Figure X-14) The ice will not eject properly, causing slabbing.
The plastic tray in these machines seems to be more prone to scale and calcium buildup than other designs, causing improper ejection and slabbing.
I'm not sure what causes it, but if you hear the icemaker ticking like a clock, and it's annoying you, replace the icemaker head.


The refrigerator's defrost function is built into the icemaker in these machines. Thus, the icemaker must be plugged in at all times, even if it's not being used to make ice. If you no longer use the refrigerator icemaker and wish to remove it from your machine, a module is available that replaces the icemaker with a smaller "box" unit that just performs the defrost function. Ask your appliance parts distributor for details.
In Whirlpool flex-tray icemakers, first check that the icemaker drive motor is turning. It should turn constantly while the compressor is running. If it is, there are a number of things that could be causing the icemaker to stop making cubes, but the solution to all of them seems to be to throw a new gear and pin set in both the front and back of the icemaker head. (The ejection gears are in the front of the head; the defrost timing gears are under a cover on the backside of the head)
For instructions on how to replace the gear set on this icemaker, CLICK HERE

This is true even if the gears look allright to begin with, but especially if any teeth are stripped on the drive gear, or if the tray is stopped in a position other than upright. Gear alignment instructions are included with the new gears.
There is no way to manually initiate a harvest cycle in these machines. When you replace and realign the gears and reinstall the icemaker, it will immediately enter a harvest cycle and fill with water.
Run time only accumulates on these icemakers when the cold control (the refrigerator's thermostat) is closed and the compressor is running. If the doors remain closed, the ambient air temperature (outside of the fridge) is low, and the compressor doesn't run much, you may experience low ice production. In this case, set the cold control as cold as it will go to increase run time. There is also a kit available, no. 482763 with a special drive motor and fill switch. To increase ice production, the kit decreases the cycle time to 1-1/2 hours instead of 2 hours.
Please share our .